
Starting from four shapes
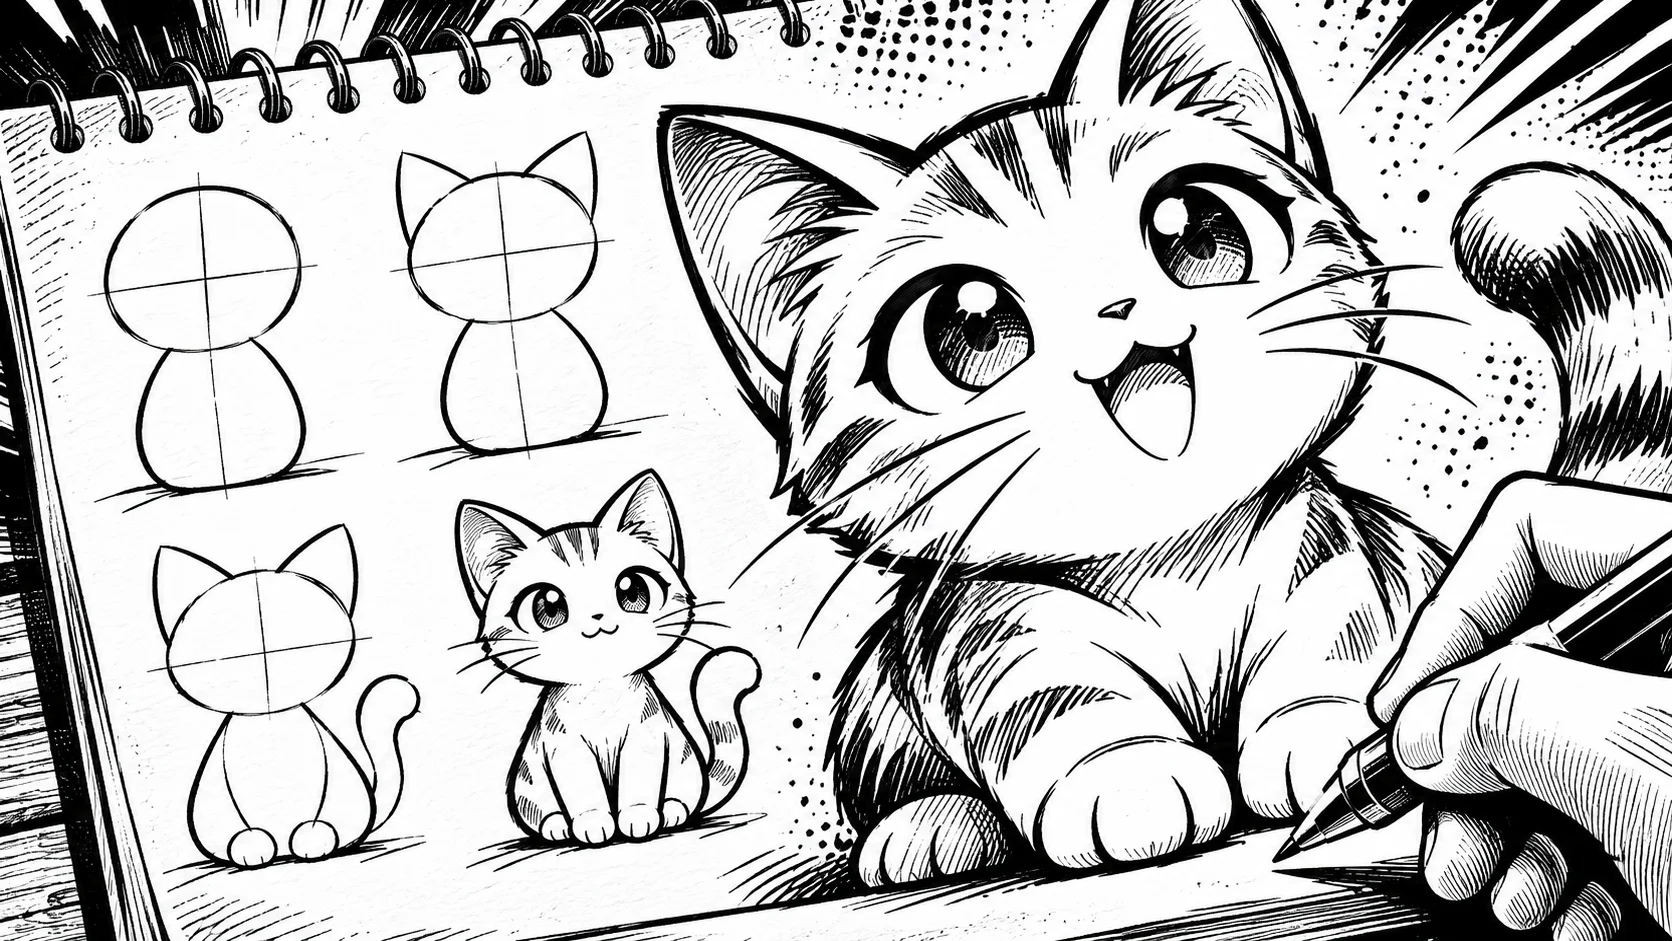
A manga cat fits into four shapes. If you place them correctly, the rest is just detail.
- The head: a slightly flattened circle, wider than it is tall.
- The ears: two triangles with rounded tips, placed on top of the circle.
- The body: an oval or a pear, smaller than the head for a chibi cat.
- The tail: an S-curve, thick at the base and thin at the tip.
Sketch these shapes with a light pencil. They serve as a skeleton: you will erase them when inking.
Placing the eyes, nose, and mouth
Human facial landmarks also work for cats. On the blog, the eye line is placed in the middle of the head, a little lower in manga, which enlarges the forehead. The mouth is placed in the lower third, and the nose remains narrower than the space between the two eyes (detailed landmarks in the article on the manga ear).
In cats, these proportions are pushed further: the eyes are very wide apart and placed low, the nose is a small triangle or a simple dot, and the mouth is a pair of "w"-shaped arcs under the nose.
The larger the eyes, the younger and more expressive the cat appears. Conversely, slit eyes give a sly or suspicious look.
Drawing the ears and whiskers
Ears convey mood. Pricked up, they express curiosity. Pinned back, they indicate fear or anger. Tilted to the sides, they give a sullen look.
Keep a simple rule: both ears are symmetrical on a cat facing forward, but never identical on a three-quarter view. The back ear is smaller and narrower.
Whiskers are three fine lines on each side, starting from the cheek. Only draw them at the end, with a stroke thinner than the outline, otherwise they weigh down the face.
The body and the tail: the posture tells the story
The manga cat is often drawn in three postures: sitting, curled up in a ball, and walking.
- Sitting: the body forms a teardrop, the front legs are two vertical lines, the tail wraps around the legs.
- Curled up in a ball: everything reduces to an oval, with the head sticking out and the tail drawing a curve.
- Walking: the back rounds, the tail stands up in a question mark.
For a chibi, reduce the body to half the size of the head and almost remove the legs. The complete method for this style can be found in the article comment dessiner un chibi.
The mistakes that betray the beginner
A few errors almost always come back.
- Too many details: a manga cat doesn't need every hair. A few tufts on the cheeks and tail are enough.
- A head that is too small: if it is smaller than the body, the cat loses its cuteness.
- Eyes that are too close together: they give an aggressive look, unless that's intended.
- A uniform stroke: vary the thickness, thicker under the body, thinner on top of the head.
Do a test: flip the page over or look at it in a mirror. Proportion mistakes immediately stand out.
Moving from drawing to a manga page
A well-drawn cat does not make a story. To place it in a page layout, you need a script, panels, and speech bubbles. If drawing each panel slows you down, Bulle generates page layouts from your idea, with no drawing skills required.
The service works on a credit system, with no subscription: a manga project costs 500 credits, and the beginner pack at €19.90 contains 2,000, which is 4 projects (prices checked on the Bulle website on 11/05/2026). You can also create your characters from photos and choose from over 20 styles, including classic manga.
A tip: draw your cat by hand first, then use it as a character reference. A simple model makes for more consistent page layouts.
Conclusion
Four shapes, precise placement of the eyes and ears, a readable posture: there is your manga cat. Practice three postures, keep the same ear shape across all your panels, and your cat will become recognizable from one page to the next.